GM70 amplifier project, started in 2003.
It is more than one year since I started thinking about new tube amplifier. I acquired some experiences building my first DIY amp based on 300B power tube. I tried to get as much as possible from the 300B tube, trying different brands, operating points, different coupling methods, drivers, parts, bypassing caps etc.
Although I get good results, confirmed by my audiophile fiends, I wasn’t fully satisfied with the sound.
My speakers are Audio Note model E, which has quite high sensitivity (94dB), but also quite demanding impedance curve. I suspected, that I could get more from the speakers, especially in lower registers, by using the stronger amplifier. My idea was to use high power triodes like 845, 211/VT-4C or Russian GM70.
I wasn’t sure what tube to use, so to make my amp as much as possible flexible, I drew the first schematics with possibility of switching between 211 and GM70 tube by changing the heater voltage (10 and 20V) and removing the first capacitor in a power tube PSU, to change the anode voltage keeping the same bias voltage for the both tubes.
Finally I decided to use GM70 tubes only. They were cheap and had excellent reports among audiophiles. They were also more “off road” J, exotic.
I started building the test circuit on the breadboard. First setup was:
AVVT AV8 – IT 1:1 tribute, 5k, 30mA DC max – 300B – IT Lundahl LL1677 1:2 80mA DC – GM70
I was not fully satisfied of an idea of using 1:2 step-up interstage transformer, because GM70 was intended to work also in A2 class, when GM70 grid current has to be taken into account. The better idea was to use 1:1 or even step-down transformer. What I really wanted, was to keep the amp away from indirectly heated tubes.
I bought the second pair of AV8 tubes (there was a discount for them, about 40% off!) and second 1:1 interstage transformer and changed the 1:2 IT to 1:1 ratio. The gain of that stage was almost the same. AVVT AV8 has a mu=8 which is equal to the mu=3.8 of 300B multiplied by two (IT1:2).
I decided to choose the operating point of GM70 at 850V/125mA/-70V. The gain of the driver stage was more than 60x, so I get about 1.2V for full A1 output and about 2V for full A2 output and about 35W output power. My preamp is able to deliver 4V with very low output impedance (about 10ohm!), so no problem to drive this amp.
To make this amp fully noncompromised design, I decided to use only amorphous core transformers.
Because, I already bought the IT from TRIBUTE, I followed that way and ordered the 7k/150mA/30W amorphous transformer from TRIBUTE also. 7k primary impedance was a compromise between power and distortions (and of course damping factor).
Below you can see how big are transformers cores. Transformers are potted in a 15x15x15cm can. Each has 10kg.

Both stages has it’s own PSU with CLCLC filtering. At the beginning, the idea was to use LCLC filtering, but it requires physically big, low value bleeder resistor, to prevent caps from damage, in case of any tube failure and no current going thru tube anode. CLCLC setup requires only 5mA going thru bleeder resistors.
I used Lundahl LL1638 and LL1673 low DCR chokes. Two 20H chokes for a driver stage and two 10H chokes for GM70 tube. HV caps I used are Black Gate WKZ (yes, very expensive…), so another reason for safer CLCLC setup.
The GM70 voltage is provided by Russian 5z8c indirectly heated rectifier in a hybrid configuration, with two 1200V hexfred diodes and 0-770V of the secondary of the mains transformer. Tube rectifier has about 8s to warm up. First two caps are polish NOS PIO 2uF/1000V in parallel, to give 4uF/1000V. After the second choke I have two 100+100/500V BG WKZ caps in series, to give 100uF/1000V final capacity.
AV8 tubes uses 5u4g directly heated rectifier. First cap is an SCR 10uF/630V, second BG 100uF/500V and the last one 100+100uF/500V BG WKZ. Operating point is 350V/30mA.
310-0-310V AC from the secondary of the mains transformer.
All tubes use DC heating (schottky bridge), smoothed by 20000uF-resistor-20000uF filter. AC made the sine wave dancing on a scope screen, even when using the hum pot.
Both tubes uses the fixed biasing.
After the first listening sessions of the test circuit, I decided to remove the first AV8 tube from the drive stage and change it to Lundahl LL1674 1:8 amorphous core input transformer. It gives much better sound than the active stage, and utilizes the very low output impedance of the preamp. To get the flat frequency response with such a step-up transformer you must have the preamp output impedance lower than 150ohm. No problem for meJ
I used the pure silver 0.4mm diameter wire to connect all the parts except heaters. I get much better sound than any thick cable/wire can offer. Only litz wire may compete with it. Skin effect really exists!
Below you can see the test circuit:

GM70 tube, especially copper plate version, shines with beautiful yellow light!

Here is the final schematics:

I have measured the frequency response of the amplifier. Below, the measured characteristic up-to 1kHz for 1W output power. With HF there is no problem. Curve is flat till 20kHz, and after that is slowly going down to reach about 35kHz at –3dB. The amp has three transformers in the signal path. Each of them is weakening the LF. The final result isn’t bad at all, because I get -1dB @ 30Hz, –2dB @ 20Hz and –3dB @ 15Hz.
Usually, frequency response is given for +/-3dB, so my amp sings between 15Hz - 35kHz.

Now, I have to design the chassis. I decided to use 3mm cooper sheet and monoblock arrangement. It took me 4 days to draw the elements layout.

Auto cad design of the chassis, one monoblock.

After punching the wholes, I got two beautiful copper frames, each weighting 8kg.
Copper sheets - picture

I gave them for covering with nickel and chrome. I wanted to have the oxygen resistant surface, conducting the current, for easy transformers grounding.
Chromed sheets – picture

It took me 12 hours to build the first monoblock.
Assembling the amps– picture

Inside of the amp – picture

Amp in a daylight – picture

Working amplifier - picture

After 3 days of assembling and debugging process, I finally fired up the amps. Each monoblock weights almost 40kg (82 pounds).
How does it sounds?
Good question. Let’s give it some break-in time…
I gave my GM70 amp about 40 hours for breaking-in. I didn’t switch it on and leave it for continues operation. I let it break-in gradually. It is also the debugging time, so I wanted to stay close to it while it was working. It was usually 2-3 hours/day. I added the 22k bleeder resistor across the 100uF B+ cap in a driver stage. IT takes additional 15mA current, so the first choke can work more efficiently. I used two Lundahl 100mA choke, because previously I wanted to use two driver tubes. Now it is a bit too big, and 50mA choke would fit better.
I have my first DIY 300B amplifier for reference purposes.
Immediately, after firing up my GM70 amp I was at least satisfied with the sound. The authority and the balance of the sound is the most obvious sound signature. GM70 has the excellent balance regardless the volume level. It is almost impossible to make it clipping. More than 35W output power comparing to 8W of the 300B amp makes the noticeable difference. J
Lower registers are very solid, fast and vivid. Although, the measurements show the-2dB weakening at 20Hz, GM70 amp plays much better here than 300B. It is totally in the opposition to what was measured. You hear it immediately! 300B has midrange magic, but the rest of the frequency band is only a background. GM70 has at least the same midrange quality, but it extents to the frequency extremes.
In 300B amp I had to bypass the electrolytics with the smaller polypropylene caps to get HF at the GM70 amp level. HF is very clear, very real. Metal, sounds like metal, not sand.
TRIBUTE. I wasn’t fully satisfied with the sound when I switched on my amp at first time. The authority and nice sound balance caught me, but the tone was far less satisfying. Tribute transformers were too warm and at the same time hard sounding, a bit glassy and sandy. On jazz recordings, percussion was nice and clear, but on the rest of the recordings sound was too warm and muddy. Always wrong. What was warm at the lower listening level was hard and glassy at the higher level.
Sometimes I was delighted; sometimes I had to take a cold beer to relax because the sound was so terrible.
After about 30 hours of listening, about a week, the sound started stabilizing. Now, after 40 hours GM70 makes a constant smile on my face. Sound outperformed 300B amp by a huge margin.
I don’t blame 300B tube, Lundahl transformers or ELNA caps. My new GM70 amp should be better. I would be very surprised if it fails the competition with my first DIY 300B amp.
GM70 has:
1. Amorphous core Tribute transformers
2. Black Gate capacitors
3. Double PSU chokes and independent PSU units
4. Direct heated driver tube (AV8)
5. Two monoblocks, not a stereo amp
24.06.2003
After listening to my new amp for another long hours, new problems with the sound came up.
I stay in contact with tube fans all over the world, also with the ones using Tribute transformers. They pointed out that the amorphous core transformers sounds cold. So far my experiences did not prove these points. The more was I surprised when few days ago my amp started irritating me. The voices became too cold; instruments hardened and became a little obvious and stiff. The sound has typical digital stiffness. After few days my irritation reached the top. I couldn't listen to music!
Definitely, the sound needed to be warmed up. I already had some experiences from the previous projects:
1. I changed two DALE RS-5 22ohm driver cathode resistors to 2W tantalums.
2. I changed the DAC output 220k Caddock resistor (very precise sound, a bit cold) to tantalums
3. I changed ELNA CERAFINE 220uF/100V preamp cathode caps to Black Gate.
Black Gate sounds much more natural, richer, even though they have less 'air' in the higher registers. The last change was the most effective. My new GM70 amp is terribly analytical and precise. It uncovers all the imperfections of the signal path… and I expected that the amorphous cores transformers would add warm, romantic mist...but it turned out to be a razor sharp transistor like!J
As always you need time to hear the changes. The sound is much more balanced now and the unpleasant hard and mechanical sound is gone.
Ones again it turns out, that the final sound tuning is necessary. Change of one signal element is much cheaper than the change of complete boxes of the system or cables... however the owners of the transistor equipment have little to do in that subject...
Maciej, 24. June.2003
16.07.2003
I’m still tuning my amp. I made a lot of changes in the electrical circuit. I removed second choke in each PSU unit. It is another proof, that not always something, which is theoretically perfect, sounds the best. Double chokes make sound stiff and hard, dry and shouty, very precise but mechanical. Of course, there is a problem with hum using only one choke, but can be solve easily. Finally, the C-L-C PSU with 33uF/400V (polypropylene, AUDYN) – 20H choke and 200uF/500V Black Gate cap sound very well. Sound has the excellent clarity and musicality. In GM70 PSU I added another 4uF/1000V capacitors to get finally 8uF/10000V, so: C-L-C PSU with 8uF/1000V – 10H choke and 100uF/1000V BG caps.
The second main change in my amp architecture was changing the self-biasing to autobias. This change gave sound more body. Sound is fuller now and it is safer in case of any tube failure. This is the last amp schematics

13.10.2003
Another 3 months are gone; it is time to change something! I decided to reconfigure my amp architecture. I always had a feeling, that I can get more dynamics and feeling of power from GM70 tube. I wanted to try to change the input step-up transformer to the tube active stage. I chose the Russian 6H6P double triode. It has an excellent reputation and is electrically similar to the tubes like ECC99, E182CC or 5687. I wanted to have the lowest possible Rp, so the operating point: –1.8V, 30mA, 125V was one of the best choices. Under the resistor 5.4kohm load, tube has a gain of 15.5. The whole driver section gain is about 133x, which givers the overall amplifier sensitivity = 0.85V for full power.
I decided not to use another interstage transformer, but the simple RC configuration. First listening was done with 0.47uF Audio Note PIO copper foil coupling capacitor. In anode I used Black Gate WKZ 100uF/500V cap, which was previously removed together with chokes.
What about sound?
Excellent dynamics, power, energy, but without the input transformer clarity. Sound was a bit gray. I changed AN copper foil to silver foil 0.22uF/500V version and…REVELATION! I got back the lost clarity, but the power, dynamics and energy remained at least at the same level! There is one problem with silver Audio Note caps…price. I heard the positive comments regarding Mundorf silver PIO caps, so maybe here you get the less expensive alternative. The side effect of the driver change was the increased power of the amplifier. Now I measure the clear 48W(!) at clipping point.
I took a chance and measured the whole driver section, with two tubes, interstage transformer and coupling capacitor. The square wave is perfect, even for 10kHz. No ringing at all. The frequency response is flat till 120kHz, and starting slowly going down from this point.
At 20Hz there is a small weakening, about –0.5 to –1dB. Excellent results!
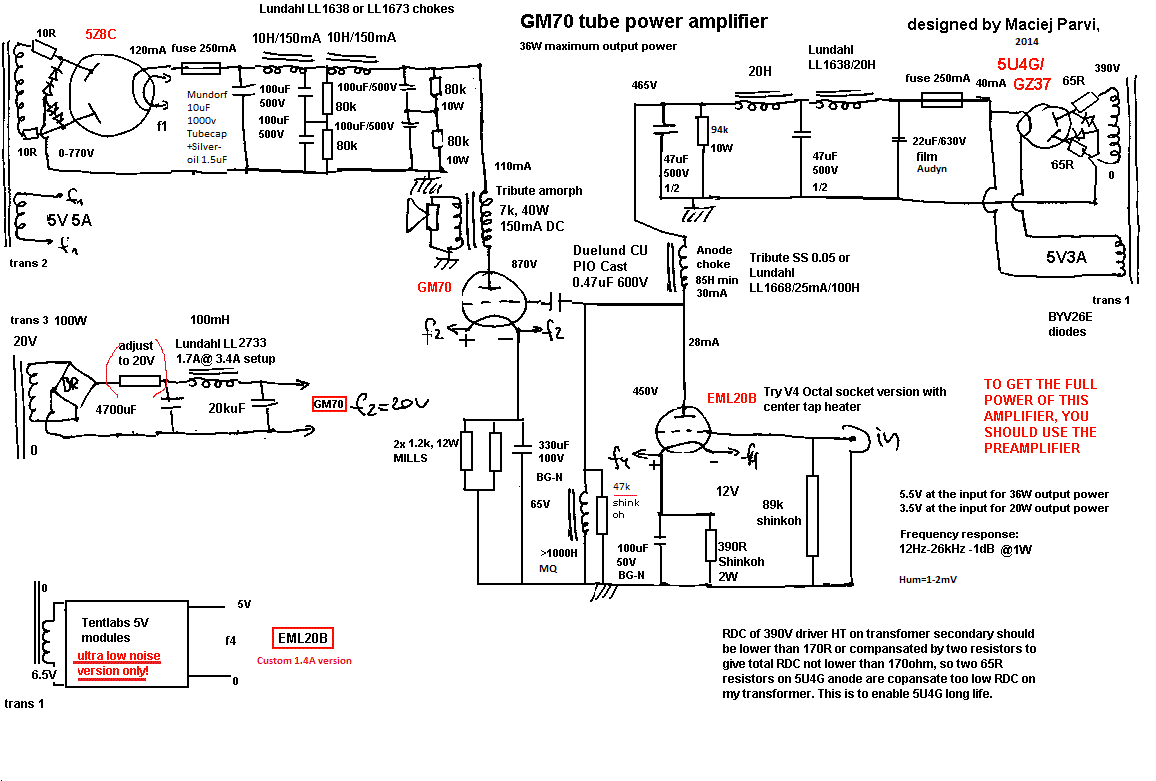
Here is the newest schematics

How the amp look inside now

February 2014
After many years of changes, the final schematics is: